Setting up clusters of blueprint design servers#
You can set up clusters of blueprint design servers for a high-availability configuration. As with setting up clusters of servers, you store shared files on a system and set multiple blueprint design servers to use those files.
- Each blueprint design server in the cluster must run the same version of HCL™ Launch.
- Install an HCL Launch server and create a token that the blueprint design servers can use to access it.
- Set up a system to host the databases, shared files, and load balancer. These resources can be on the same system or on separate systems. If you have a cluster of servers or engines, you can use the same cluster resources or set up separate cluster resources for the blueprint design server cluster.
To set up blueprint design servers and engines in a clustered configuration, you install them on separate systems and connect them to the same database and network storage. You can install as many blueprint design servers and engines as you need. You can install a blueprint design server and an engine on each cluster node, or you can install blueprint design servers and engines on separate nodes.
You do not need to install the same number of blueprint design servers and engines. Most high-availability setups need more engines than blueprint design servers.
Then, you configure a load balancer to distribute the traffic to the blueprint design servers. Instead of accessing the blueprint design servers and engines directly, users access the load balancer URL. To the users, that URL appears to host a single instance of the blueprint design server or engine.
A complete high-availability system of blueprint designers and engines includes the following systems:
- One or more blueprint design server nodes
- One or more engine nodes
- A database for the engine nodes and the RabbitMQ service
- A database for the blueprint design server nodes
- A shared file system for the blueprint design server nodes
- A load balancer
You can install each of these systems on a separate server, or you can combine some of them to reduce the number of overall nodes. For example, you can use the same database for the engine nodes and the blueprint design server nodes. You can also install one or more of the databases, shared file system, and load balancer on the same server. However, for greatest reliability, install the load balancer, databases, and shared file system on separate servers. For example, the following topology diagram includes three blueprint design server nodes, three engine nodes, and a single server that hosts the databases, RabbitMQ, and shared file system.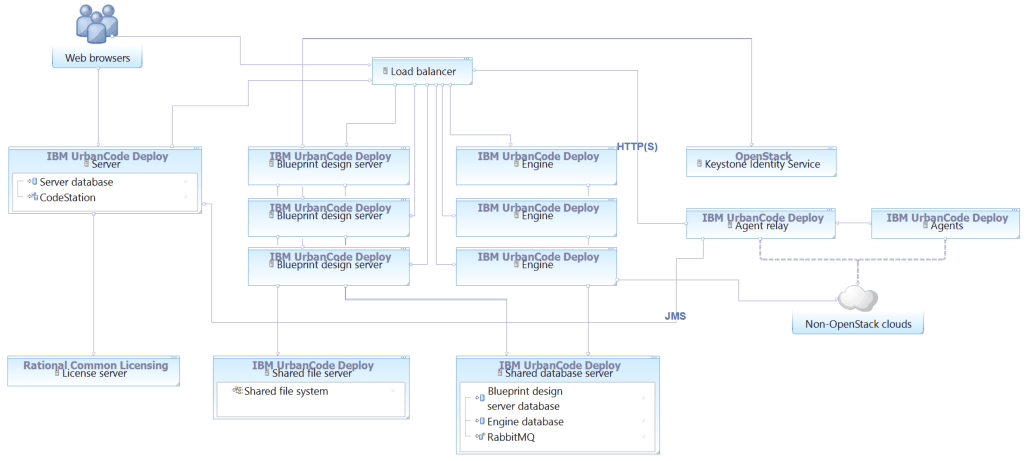
Note: These instructions host the RabbitMQ service and engine database on a single server, and the shared file system on a single server. For a truly high-availability setup, you must ensure that these systems are stable and reliable. For example, you can configure automatic backups and have a cold standby system ready, or you can create a high availability cluster of databases. For a description of configuring a high availability MySQL cluster, Database (Galera Cluster) for high availability .
You can set up a cluster of blueprint design servers and engines independently of the HCL Launch server. You do not necessarily have to have a cluster of HCL Launch servers.
-
Set up a database for the blueprint design servers as described in Blueprint design server database configuration.
For example, to reuse the engine database, you can add a user and database for the blueprint design server with the following commands:
CREATE USER 'ibm_ucdp'@'localhost' IDENTIFIED BY 'password';```
CREATE DATABASE ibm_ucdp; ```
```
GRANT ALL ON ibm_ucdp.* TO 'ibm_ucdp'@'%' IDENTIFIED BY 'password' WITH GRANT OPTION; ```
If you use a MySQL database, you use the same JDBC connection information even if you configure a high availability MySQL cluster.
-
Set up network storage for the configuration files, such as with an NFS file system.
Because each blueprint design server node must access the same configuration files, each blueprint design server node must have access to this network storage.
-
On the system that hosts the network storage, create two folders to share with the blueprint design server nodes: one that contains the repositories that store blueprints and another that contains user workspaces.
The default locations of these folders are in the following list, but you can put the two directories anywhere:
- /opt/ibm-ucd-patterns/repositories
- /opt/ibm-ucd-patterns/workspace
- Set up the network storage to share these folders.
For example, if you are using NFS to share the files, install NFS with the following commands:
yum -y install nfs-utils nfs-utils-libservice rpcbind startchkconfig nfs onThen, add the following lines to the file /etc/exports:
``` /opt/ibm-ucd-patterns/repositories designer1.example.com(rw,sync,no_root_squash) designer2.example.com(rw,sync,no_root_squash) designer3.example.com(rw,sync,no_root_squash)
/opt/ibm-ucd-patterns/workspace designer1.example.com(rw,sync,no_root_squash) designer2.example.com(rw,sync,no_root_squash) designer3.example.com(rw,sync,no_root_squash) ```
Change
designer1.example.com,designer2.example.com, anddesigner3.example.comto the host names or IP addresses of the nodes that you plan to install blueprint design servers on. -
Verify that the network storage is running and hosting the files.
For example, if you are using NFS, start the rpcbind service, set the NFS service to run at startup, and start the NFS service:
``` service rpcbind start
```
``` chkconfig nfs on
```
service nfs startThen, verify that the shared folders are accessible by running the following command:
showmount -e hostnameUse the host name of the network storage system for hostname. The correct result shows the locations of the two folders that you are sharing.
-
-
Set up online and offline backups for the blueprint design servers.
-
Install a load balancer to send requests to the nodes.
For example, the HAProxy load balancer can distribute traffic to a cluster of blueprint design servers and engines: http://www.haproxy.org/. The following steps describe a basic HAProxy setup:
-
Install HAProxy.
For example, on Linux™ systems that use the yum package manager, run the following command:
yum install -y haproxy -
Set up the file /etc/haproxy/haproxy.cfg to distribute load to the nodes.
The load balancer must distribute traffic on the following ports to the blueprint design server nodes:
- 8080
-
7575 The load balancer must distribute traffic on the following ports to the engine nodes:
-
5000
- 35357
- 8004
- 8000
The following example file distributes load to three blueprint design server nodes that have the host names
designer1.example.com,designer2.example.com, anddesigner3.example.com. It also distributes load to three engine nodes that have the host namesengine1.example.com,engine2.example.com, andengine3.example.com.
```
---------------------------------------------------------------------#
Example configuration for a possible web application. See the#
full configuration options online.#
#
http://haproxy.1wt.eu/download/1.4/doc/configuration.txt#
#
---------------------------------------------------------------------#
---------------------------------------------------------------------#
Global settings#
---------------------------------------------------------------------#
global # to have these messages end up in /var/log/haproxy.log you will # need to: # # 1) configure syslog to accept network log events. This is done # by adding the '-r' option to the SYSLOGD_OPTIONS in # /etc/sysconfig/syslog # # 2) configure local2 events to go to the /var/log/haproxy.log # file. A line like the following can be added to # /etc/sysconfig/syslog # # local2.* /var/log/haproxy.log # log 127.0.0.1 local2
chroot /var/lib/haproxy pidfile /var/run/haproxy.pid maxconn 4000 user haproxy group haproxy daemon # turn on stats unix socket stats socket /var/lib/haproxy/stats---------------------------------------------------------------------#
common defaults that all the 'listen' and 'backend' sections will#
use if not designated in their block#
---------------------------------------------------------------------#
defaults mode http log global option httplog option dontlognull option http-server-close option forwardfor except 127.0.0.0/8 option redispatch retries 3 timeout http-request 10s timeout queue 1m timeout connect 10s timeout client 1m timeout server 1m timeout http-keep-alive 10s timeout check 10s maxconn 3000
listen stats *:1936 mode http log global
maxconn 10
timeout client       100s
timeout server       100s
timeout connect      100s
timeout queue        100s

stats enable
stats refresh 7s
stats show-node
stats uri /haproxy?stats
frontend keystone_api bind *:5000 default_backend keystone_api_back
frontend keystone_admin bind *:35357 default_backend keystone_admin_back
frontend heat_api bind *:8004 default_backend heat_api_back
frontend heat_cfn bind *:8000 default_backend heat_cfn_back
frontend heat_cloudwatch bind *:8003 default_backend heat_cloudwatch_back
frontend ucdp bind *:8080 default_backend ucdp_back
frontend cds bind *:7575 default_backend cds_back
backend keystone_api_back balance roundrobin server enginenode1 engine1.example.com:5000 check server enginenode2 engine2.example.com:5000 check server enginenode3 engine3.example.com:5000 check option httpchk
backend keystone_admin_back balance roundrobin server enginenode1 engine1.example.com:35357 check server enginenode2 engine2.example.com:35357 check server enginenode3 engine3.example.com:35357 check option httpchk
backend heat_api_back balance roundrobin server enginenode1 engine1.example.com:8004 check server enginenode2 engine2.example.com:8004 check server enginenode3 engine3.example.com:8004 check option httpchk
backend heat_cfn_back balance roundrobin server enginenode1 engine1.example.com:8000 check server enginenode2 engine2.example.com:8000 check server enginenode3 engine3.example.com:8000 check option httpchk
backend heat_cloudwatch_back balance roundrobin server enginenode1 engine1.example.com:8003 check server enginenode2 engine2.example.com:8003 check server enginenode3 engine3.example.com:8003 check option httpchk
backend ucdp_back balance roundrobin server designernode1 designer1.example.com:8080 check server designernode2 designer2.example.com:8080 check server designernode3 designer3.example.com:8080 check option httpchk OPTIONS / option forwardfor option http-server-close appsession JSESSIONID len 52 timeout 3h
backend cds_back balance roundrobin server designernode1 designer1.example.com:7575 check server designernode2 designer2.example.com:7575 check server designernode3 designer3.example.com:7575 check option httpchk
```
-
Ensure that HAProxy runs at system startup.
For example, on Red Hat Enterprise Linux (RHEL) version 7, run the following command:
systemctl enable haproxy.service -
Start HAProxy or restart the service if it is already running.
For example, on RHEL version 7, run the following command:
systemctl start haproxy.service
-
-
Verify that the load balancer is running and that it is ready to distribute traffic to the nodes.
For example, if HAProxy is installed on a system with the host name
ucd-patterns.example.com, you can go to the following URL to see the status of the nodes:http://ucd-patterns.example.com:1936/haproxy?stats
After you configure the load balancer to distribute connections to the systems, users can connect to a single URL and use the entire cluster. The servers also ensure that the correct number of licenses are used, even if a user accesses multiple servers.
Several server processes behave differently than with individual servers. See High-availability server processes.
Add blueprint design servers to the cluster. See Adding blueprint design servers to clusters.